Gate Access via Phone Call
In this tutorial, you will learn how to set up a secure, port-forwarding-free integration between Twilio and your Fentrica Edge Device. We will create an automation that allows authorized users to open a gate simply by calling a phone number.
The system verifies the caller's phone number against your building's user database. If a match is found, the Fentrica controller triggers a relay to open the gate.
Why Use This?
- Fully automated access — replace autonomous gate phone number management with the Fentrica Platform via integrations.
- No port forwarding or public IP — the Fentrica Cloud Broker handles secure connectivity out of the box.
- Automatic access management — when integrated with PMS software, tenant access is synced automatically.
- Works with any gate — any gate controller with a dry-contact relay input is compatible.
System Overview
We use the Fentrica Webhook Node to receive events from Twilio. This node leverages the Fentrica Cloud Broker to deliver secure webhooks directly to your controller without requiring public IP addresses, port forwarding, or complex firewall configurations. It automatically adds a TLS security layer to your webhook.
Prerequisites
- Fentrica Edge Device: A controller registered on the platform with Output R0 wired to your gate's trigger input.
- Twilio Account: You need a Twilio account (Trial or Paid) with a phone number. Here's Twilio's documentation:
- Fentrica Bench: Access to the Flow Editor for your device.
- Edge device connected: Fentrica edge device connected to internet and to the gate.
- Basic JavaScript knowledge: The flow uses function nodes with simple JavaScript. You should be comfortable reading code like
if/elsestatements and object properties (e.g.,msg.payload.Caller). No advanced knowledge is required.
Step 1: Import the Automation Flow
To get started quickly, we have prepared a pre-configured flow.
- Open Fentrica Bench for your device.
- Click the Menu icon (top right) and select Import.
- Use the flow provided below. You can either copy it to your clipboard or download it as a JSON file.
Twilio Gate Access Flow
Import into Fentrica Bench
Step 2: Configure Twilio
- Get a Phone Number: Sign up or log in to Twilio and obtain a local phone number.
- Locate your Webhook URL:
The webhook URL follows this format:
https://broker.fentrica.com/api/larva-device/:deviceSn/webhook/:webhookId- :deviceSn: Your Device Serial Number (found in the Settings menu in Fentrica). - :webhookId: The ID generated in the flow node (e.g., `b4bb9bcf-ebd8-4401-9682-ebaf0d9dd1d5`).Ensure Fentrica Cloud is enabled on your device and that it is registered to the platform.
- Configure the Number:
- Go to your Twilio Phone Number settings.
- Under Voice & Fax -> A Call Comes In, select Webhook.
- Paste your full Webhook URL.
- Ensure the method is set to
POST.

Security Note: In this example, the Webhook ID acts as your security credential. For production systems, we recommend adding an API key or a shared secret in the webhook headers for additional authentication. We suggest generating a random UUID for your Webhook ID.
How it Works
Once imported, your flow should look like this in Fentrica Bench:
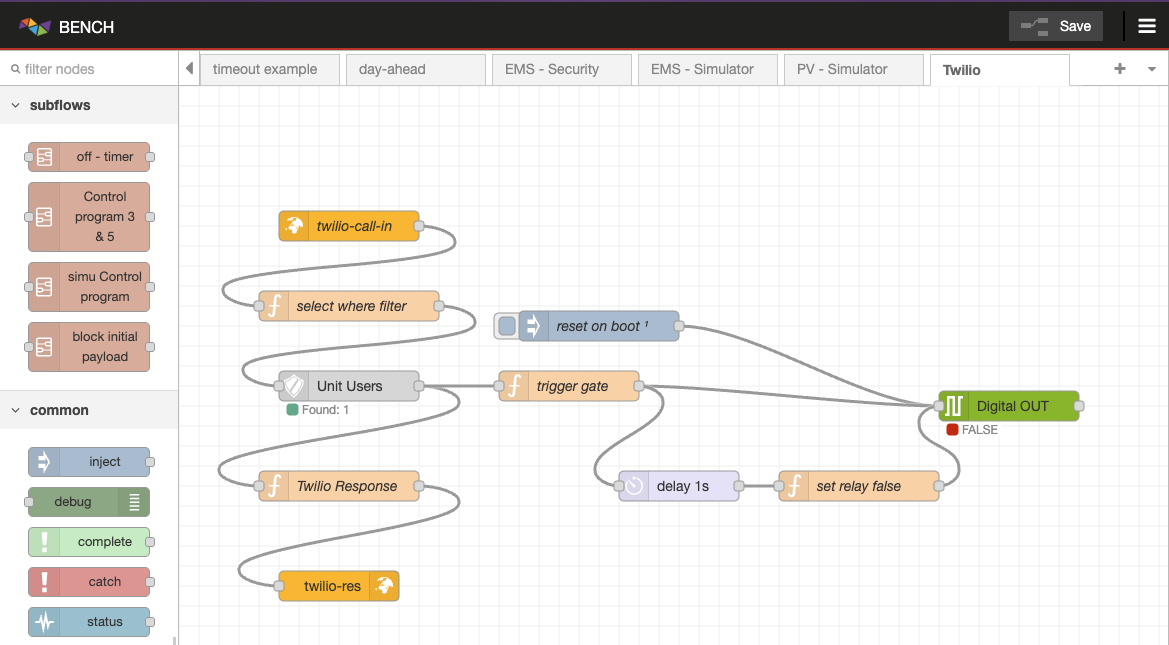
Here is a breakdown of the logic inside the automation flow:
- Webhook Trigger (
lar-cloud-http-in): Receives thePOSTrequest from Twilio when a call is received. The request contains the caller's phone number inmsg.payload.Caller. - Filter Logic (
select where filter): Extracts the caller's number and prepares a query object:msg.payload = { where: { phone: caller } }; - User Lookup (
lar-unit-users): Queries the internal user database to see if any user matches the provided phone number. Be sure to set the Unit property in the node to the specific unit (smart space) where you have the users who should have access to the gate. - Decision & Response:
- If a user is found:
- Sends a TwiML response to Twilio to say "Gate opened".
- Triggers the relay logic.
- If no user is found:
- Sends a TwiML
<Reject/>response, ending the call immediately.
- Sends a TwiML
- If a user is found:
- Gate Trigger Logic:
- Relay On: Sets the relay output (
R0) totrue(High). - Delay: Waits for 1 second.
- Relay Off: Sets the relay output to
false(Low).
This creates a "falling edge" pulse, commonly used to trigger gate controllers. - Relay On: Sets the relay output (
When the Fentrica platform is used with integrations, gate access can be fully automated. For example, you can integrate with Property Management Software (PMS) or Hotel Management software (e.g., Bidrento, Modern, Mews, etc.) directly through the Fentrica platform to sync users to the edge device in real-time. This ensures there are no "ghost users" and the system works seamlessly without manual updates.
Troubleshooting
| Problem | Cause | Solution |
|---|---|---|
| Call goes to voicemail / no webhook fires | Twilio number not configured correctly | Verify the webhook URL and POST method in Twilio Phone Number settings |
| Webhook fires but gate doesn't open | User's phone not in the unit database | Ensure the caller's number (with country code, e.g. +372...) matches exactly in the user record |
| Gate opens but relay doesn't reset | Delay node misconfigured | Check that the delay node is set to 1 second |
403 or 404 from broker | Device not registered or Cloud not enabled | Enable Fentrica Cloud in device settings and ensure it's online |
| Twilio trial limitations | Trial accounts can only call verified numbers | Upgrade to a paid Twilio account or verify the caller's number in Twilio |