Creating Re-usable Export Files
A raw export from the platform is a snapshot — it bakes in the exact IP addresses, ports, unit IDs, and other credentials that were entered when the system was commissioned. That is great for backups, but not great for reuse: if you import the same .fpl into ten sites, every site ends up with the same IP and unit ID, which almost never matches reality.
This tutorial shows you how to promote hard-coded values into variables so the importer prompts for the right value at each site — turning a one-off export into a template you can reuse across an entire fleet.
By the end of this guide you will have taken a raw heating-inverter.fpl, replaced its host, port, and unit ID with variables, and imported it into a second site using different credentials.
What you will build
One-time authoring, many imports
Prerequisites
- Admin or Manager access to a Fentrica site
- A pre-configured technical system you want to turn into a template (already exported once — see Importing and Exporting Technical Systems)
- A text editor that handles JSON well (VS Code, Sublime, Notepad++, etc.)
- A ZIP tool — any OS-level extractor works, but keep reading for platform-specific notes
A .fpl file is a standard ZIP archive with the .fpl extension so the platform recognizes it. You can rename heating-inverter.fpl to heating-inverter.zip, edit the contents, then rename it back — no special tools required.
Step 1: Export a raw template from the platform
Start with a technical system that is configured and working. This will be your reference configuration — the shape and structure of everything inside the .fpl is copied exactly as it was set up in the UI.
- Open the site from the dashboard
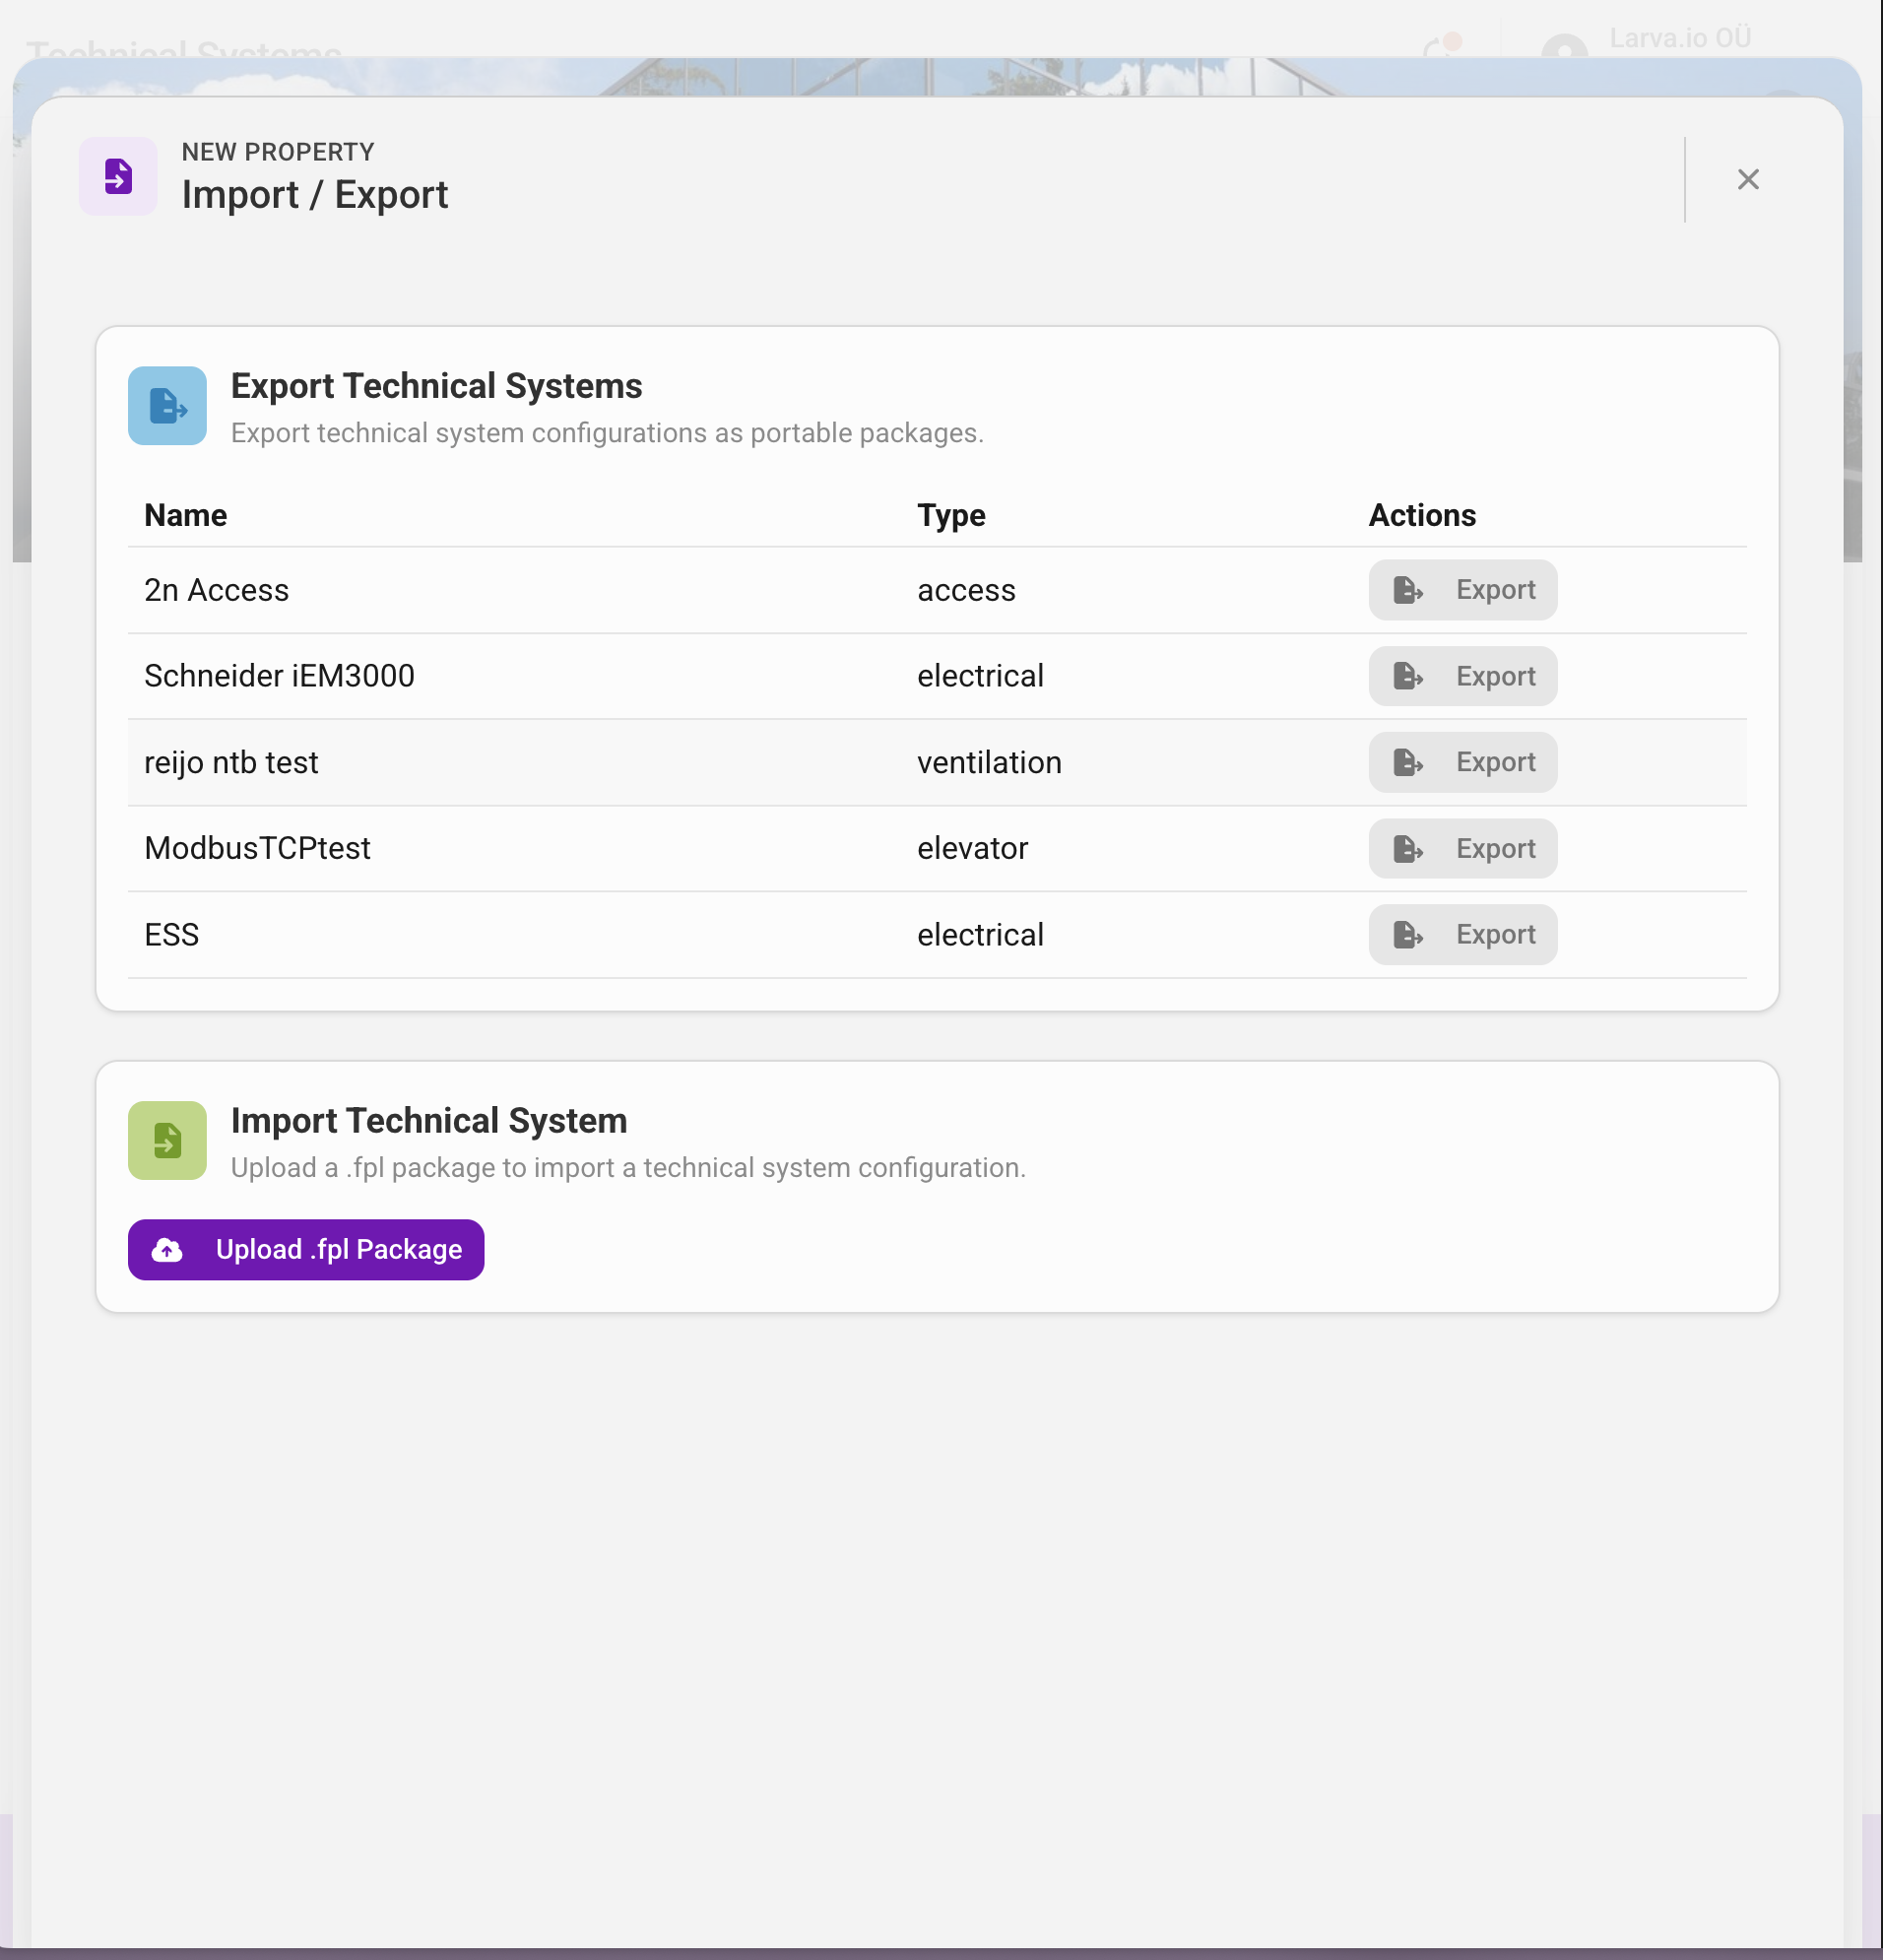
- Navigate to Settings > Import / Export
- Locate the technical system you want to templatize and click Export on its row
- Save the downloaded
.fplfile to your working directory
Start from a known-good configuration
The values inside the raw export are your baseline. Everything that works on the source site will work on every target site — as long as the variable values you enter at import time are correct for that site.
Step 2: Unpack the .fpl file
You now need to open the archive so you can edit the manifest.
macOS / Linux:
mkdir heating-inverter-template
cd heating-inverter-template
unzip ../heating-inverter.fpl
Windows:
- Right-click the file and choose Rename — change the extension from
.fplto.zip - Right-click the renamed
.zipand choose Extract All… - Pick a destination folder
Either way you end up with a directory that looks like:
heating-inverter-template/
├── manifest.json
└── assets/
    ├── .cover/
    │   └── cover.jpg
    └── documentation/
        └── service-manual.pdf
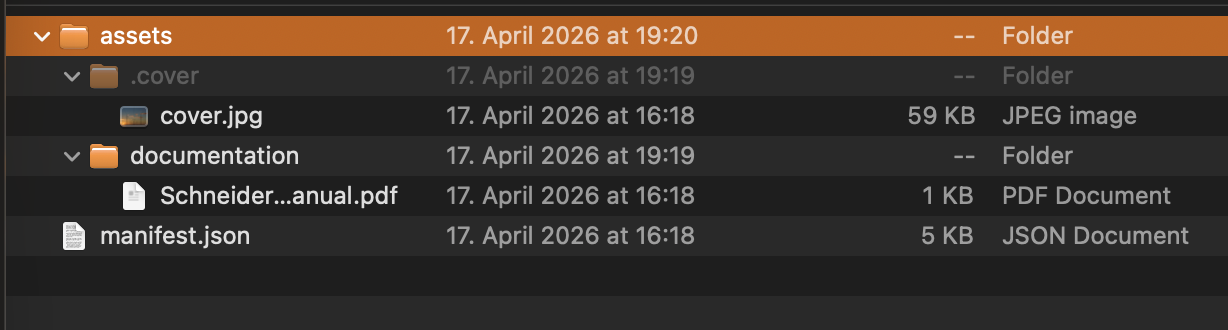
The file you care about is manifest.json. Everything in assets/ travels with the template as-is and does not need to be modified.
Step 3: Inspect the manifest
Open manifest.json in your text editor. You will see a structure similar to this (abbreviated for clarity):
{
  "$schema": "https://api.building.fentrica.com/orgs/schemas/technical-system-export-v1.json",
  "version": "1.0",
  "exportedAt": "2026-04-17T12:34:56.000Z",
  "system": {
    "name": "Heating Inverter AHU-01",
    "type": "heating",
    "manufacturer": "Daikin",
    "model": "VRV-IV"
  },
  "connections": {
    "modbus_connection": {
      "name": "Modbus Connection",
      "type": "modbus_tcp",
      "data": {
        "host": "192.168.1.100",
        "port": 502,
        "unitId": 1
      }
    }
  },
  "datapoints": {
    "supply_temperature": { "name": "Supply Temperature", "...": "..." }
  }
}
The fields most often worth turning into variables live inside connections[*].data:
| Field | Why templatize it |
|---|---|
host | Every site has a different IP address or hostname for the controller |
port | Non-standard ports vary between installations |
unitId / slaveId | Modbus unit IDs depend on how the vendor provisioned the equipment |
apiKey, token | Cloud credentials are per-site |
The system name is also a common candidate, because you usually want each imported copy to be identified by location ("AHU-01", "Boiler Room East", etc.) rather than the original name.
Step 4: Add the variables block
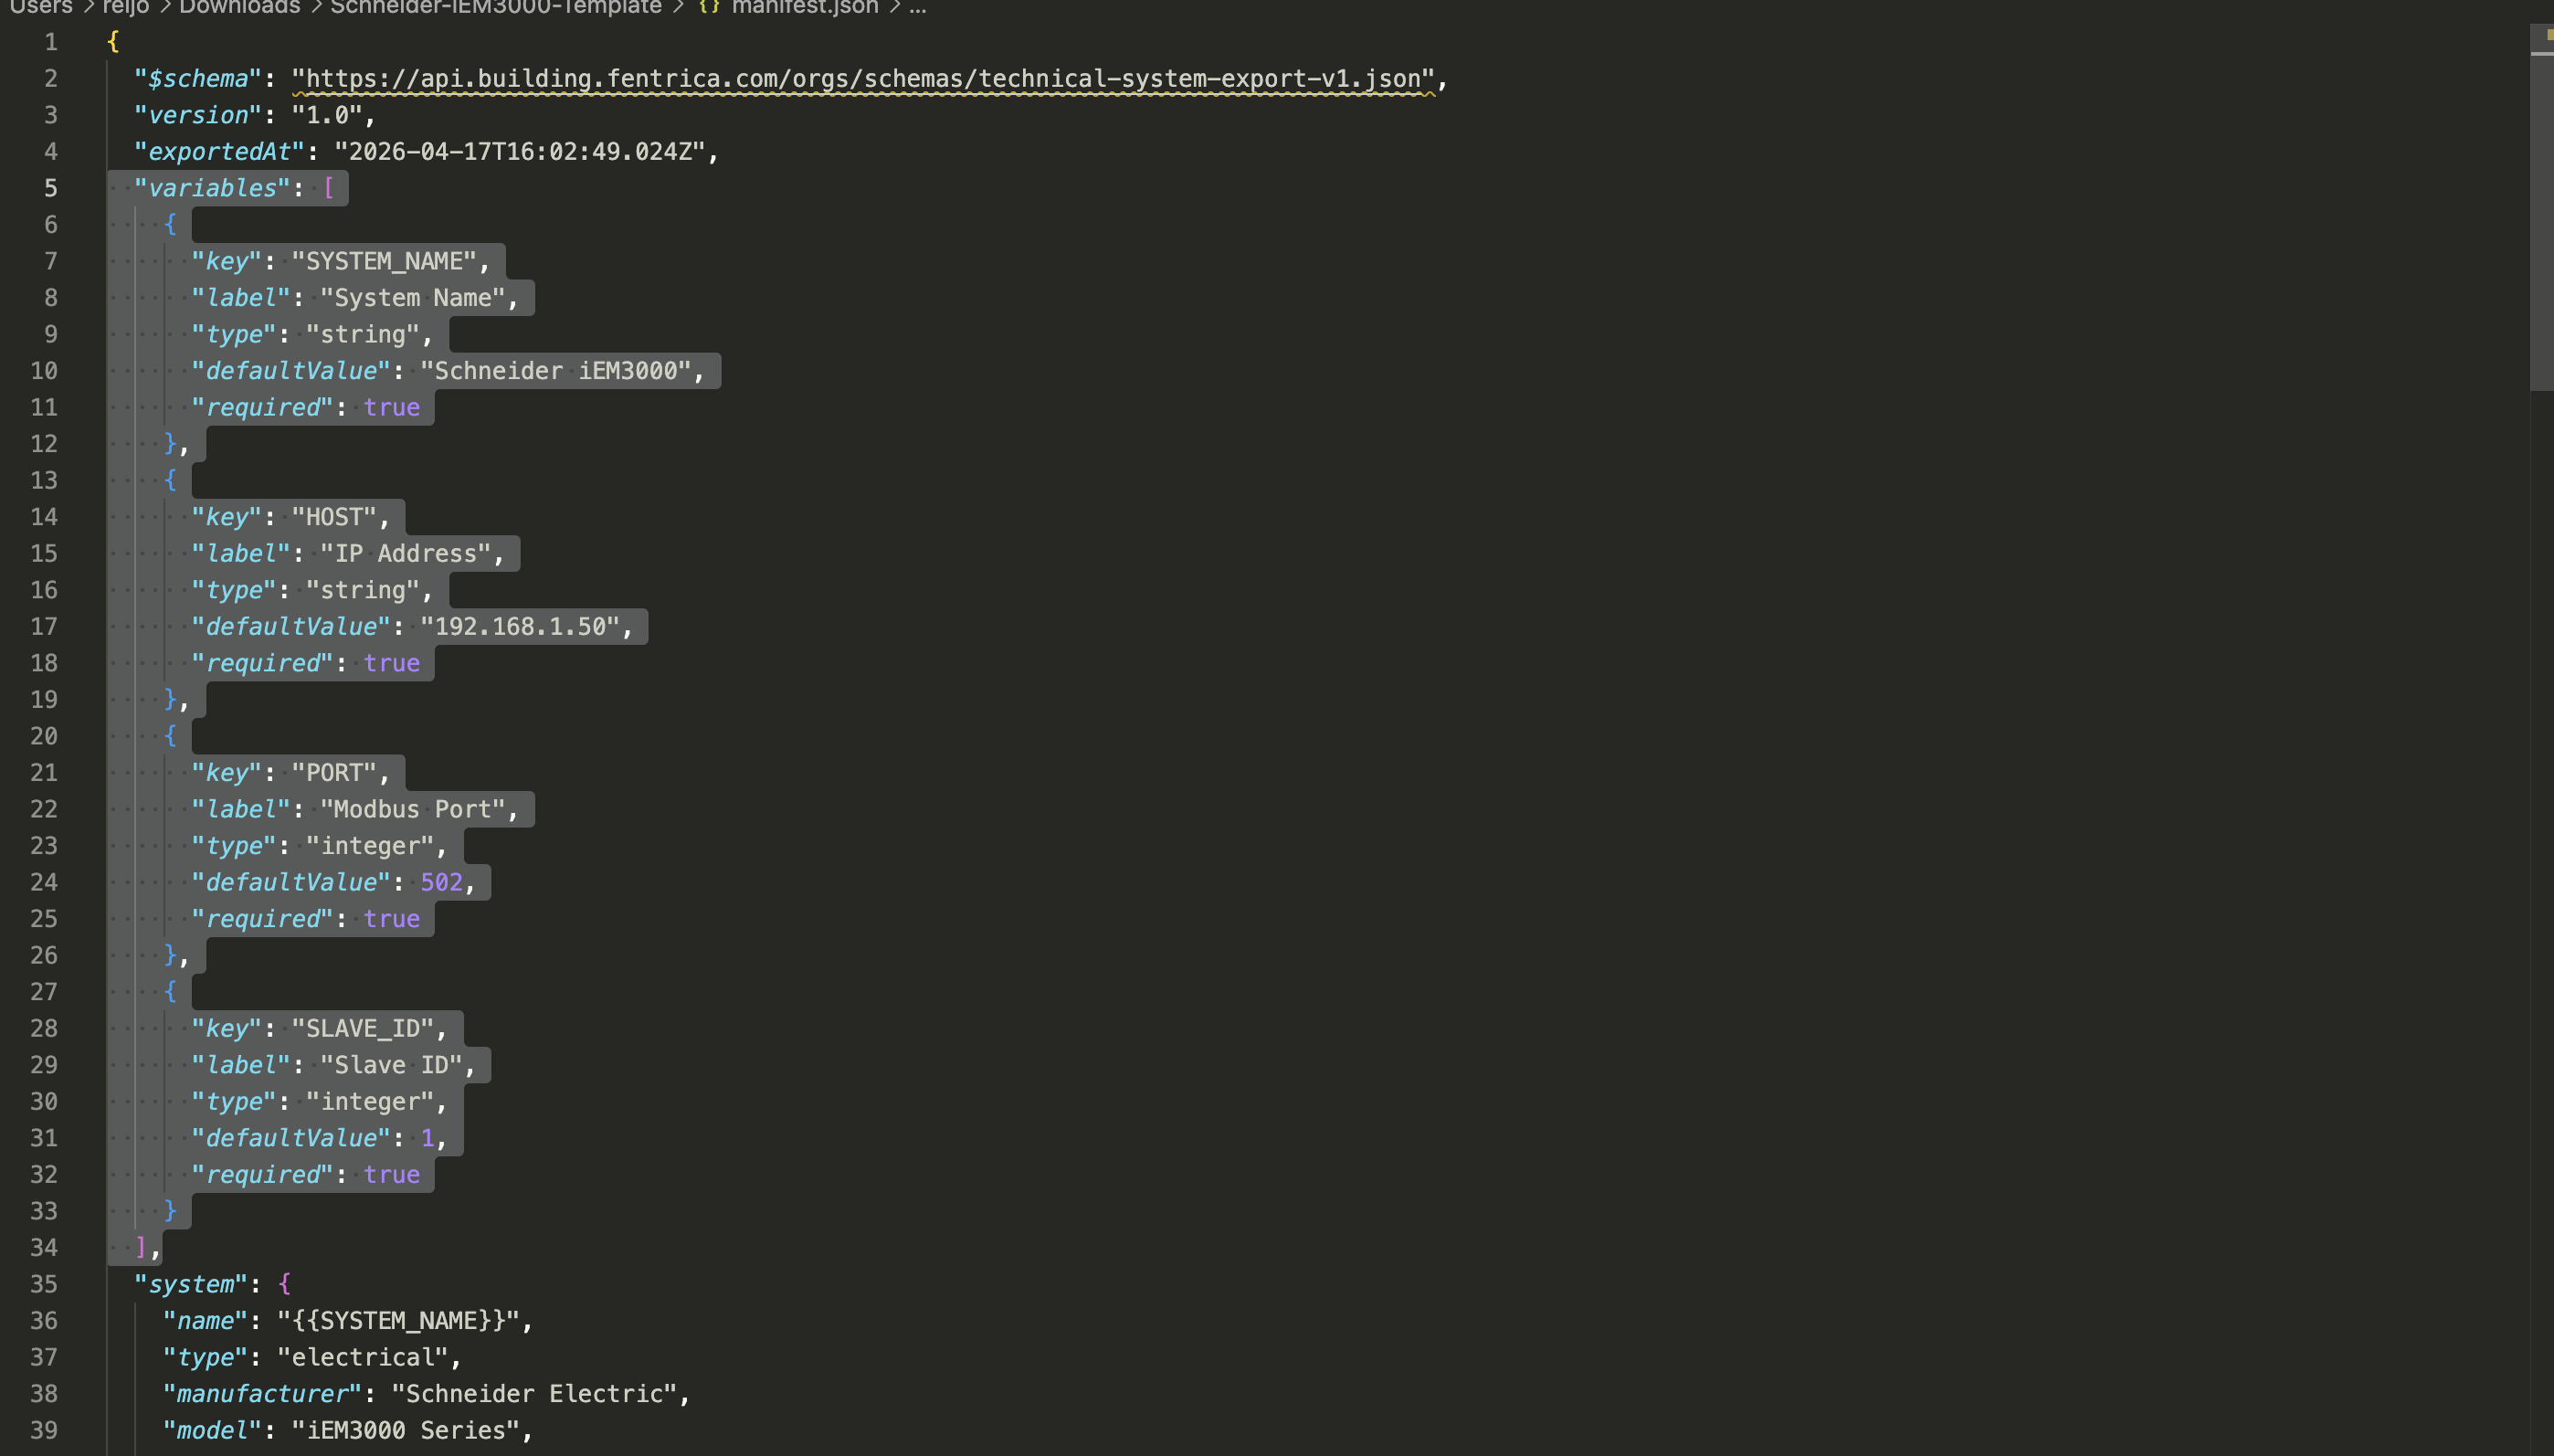
The manifest supports a top-level variables array that declares what the importer should ask for. Each variable has a key, a label, and a type.
Add a variables array just after exportedAt:
{
  "$schema": "https://api.building.fentrica.com/orgs/schemas/technical-system-export-v1.json",
  "version": "1.0",
  "exportedAt": "2026-04-17T12:34:56.000Z",
  "variables": [
    {
      "key": "SYSTEM_NAME",
      "label": "System name",
      "type": "string",
      "required": true
    },
    {
      "key": "HOST",
      "label": "Controller IP address or hostname",
      "type": "string",
      "required": true
    },
    {
      "key": "PORT",
      "label": "Modbus TCP port",
      "type": "integer",
      "defaultValue": 502,
      "required": true
    },
    {
      "key": "SLAVE_ID",
      "label": "Modbus unit/slave ID",
      "type": "integer",
      "defaultValue": 1,
      "required": true
    }
  ],
  "system": { "...": "..." }
}
Variable field reference
| Field | Description |
|---|---|
key | Unique name, uppercase letters/digits/underscore only (e.g. HOST, API_KEY, POLL_INTERVAL_MS) |
label | Human-friendly label shown in the import wizard |
type | One of string, integer, number, boolean, select |
defaultValue | Value pre-filled in the import wizard — users can override it |
options | For type: "select" only — list of allowed string values shown as a dropdown |
required | Whether the importer must fill in a value. Defaults to true — set to false only for truly optional fields |
The key you declare here is exactly the token the importer looks for later — HOST must be referenced as {{HOST}} in the manifest. Typos silently fail: the placeholder stays as literal text in the imported configuration.
Step 5: Replace hard-coded values with {{VARIABLE}} placeholders
Now go through the manifest and replace the values you promoted with {{KEY}} placeholders.
Before:
{
  "system": {
    "name": "Heating Inverter AHU-01",
    "type": "heating"
  },
  "connections": {
    "modbus_connection": {
      "name": "Modbus Connection",
      "type": "modbus_tcp",
      "data": {
        "host": "192.168.1.100",
        "port": 502,
        "unitId": 1
      }
    }
  }
}
After:
{
  "system": {
    "name": "{{SYSTEM_NAME}}",
    "type": "heating"
  },
  "connections": {
    "modbus_connection": {
      "name": "Modbus Connection",
      "type": "modbus_tcp",
      "data": {
        "host": "{{HOST}}",
        "port": "{{PORT}}",
        "unitId": "{{SLAVE_ID}}"
      }
    }
  }
}
How placeholder substitution works
During import, the platform performs a string-level replacement on the raw manifest text before parsing it as JSON:
"host": "{{HOST}}"withHOST = "10.0.0.5"becomes"host": "10.0.0.5"→ a string"port": "{{PORT}}"withPORT = 502becomes"port": 502→ a number"enabled": "{{ENABLED}}"withENABLED = truebecomes"enabled": true→ a boolean
That is why you can write the placeholder inside quotes even for integer and boolean variables — the type declared in the variables array determines how the replacement value is serialized back into the JSON.
You may see tokens like {{ref:dp:supply_temperature}} inside the controlHub or visualizationHub arrays. Those are internal datapoint references the importer resolves automatically, not user variables. Leave them alone — they are what makes your timeseries charts and control hub items point to the correct (newly created) datapoints after import.
What NOT to templatize
| Field | Why to leave it alone |
|---|---|
$schema, version | Required metadata — changing these breaks schema validation |
type on system/connections/datapoints | Enums validated against the schema; putting a placeholder fails validation |
Datapoint accessType, writeInputType | Enums — same reason |
{{ref:dp:...}}, {{ref:md:...}} | Internal ID references, not variables |
The datapoint key (e.g. supply_temperature) | Referenced by controlHub items — changing it breaks visualizations |
If you need a variable value somewhere an enum is required, you probably want two different templates rather than one.
Step 6: Re-pack the .fpl
Once manifest.json is saved, compress the folder back into a .fpl.
macOS / Linux:
cd heating-inverter-template
zip -r ../heating-inverter-template.fpl manifest.json assets
Windows:
- Select
manifest.jsonand theassetsfolder (not the parent folder — the manifest must sit at the root of the ZIP) - Right-click and choose Send to > Compressed (zipped) folder
- Rename the resulting
.zipto.fpl
manifest.json must sit at the root of the archive, not inside a subfolder. If you accidentally zip the parent folder, the importer fails with "No manifest.json found in the package".
Step 7: Test the template
Import the re-packed template into a different site (or the same site, under a different name) to verify everything resolves.
- Open the target site from the dashboard
- Navigate to Settings > Import / Export
- Click Import and upload your new
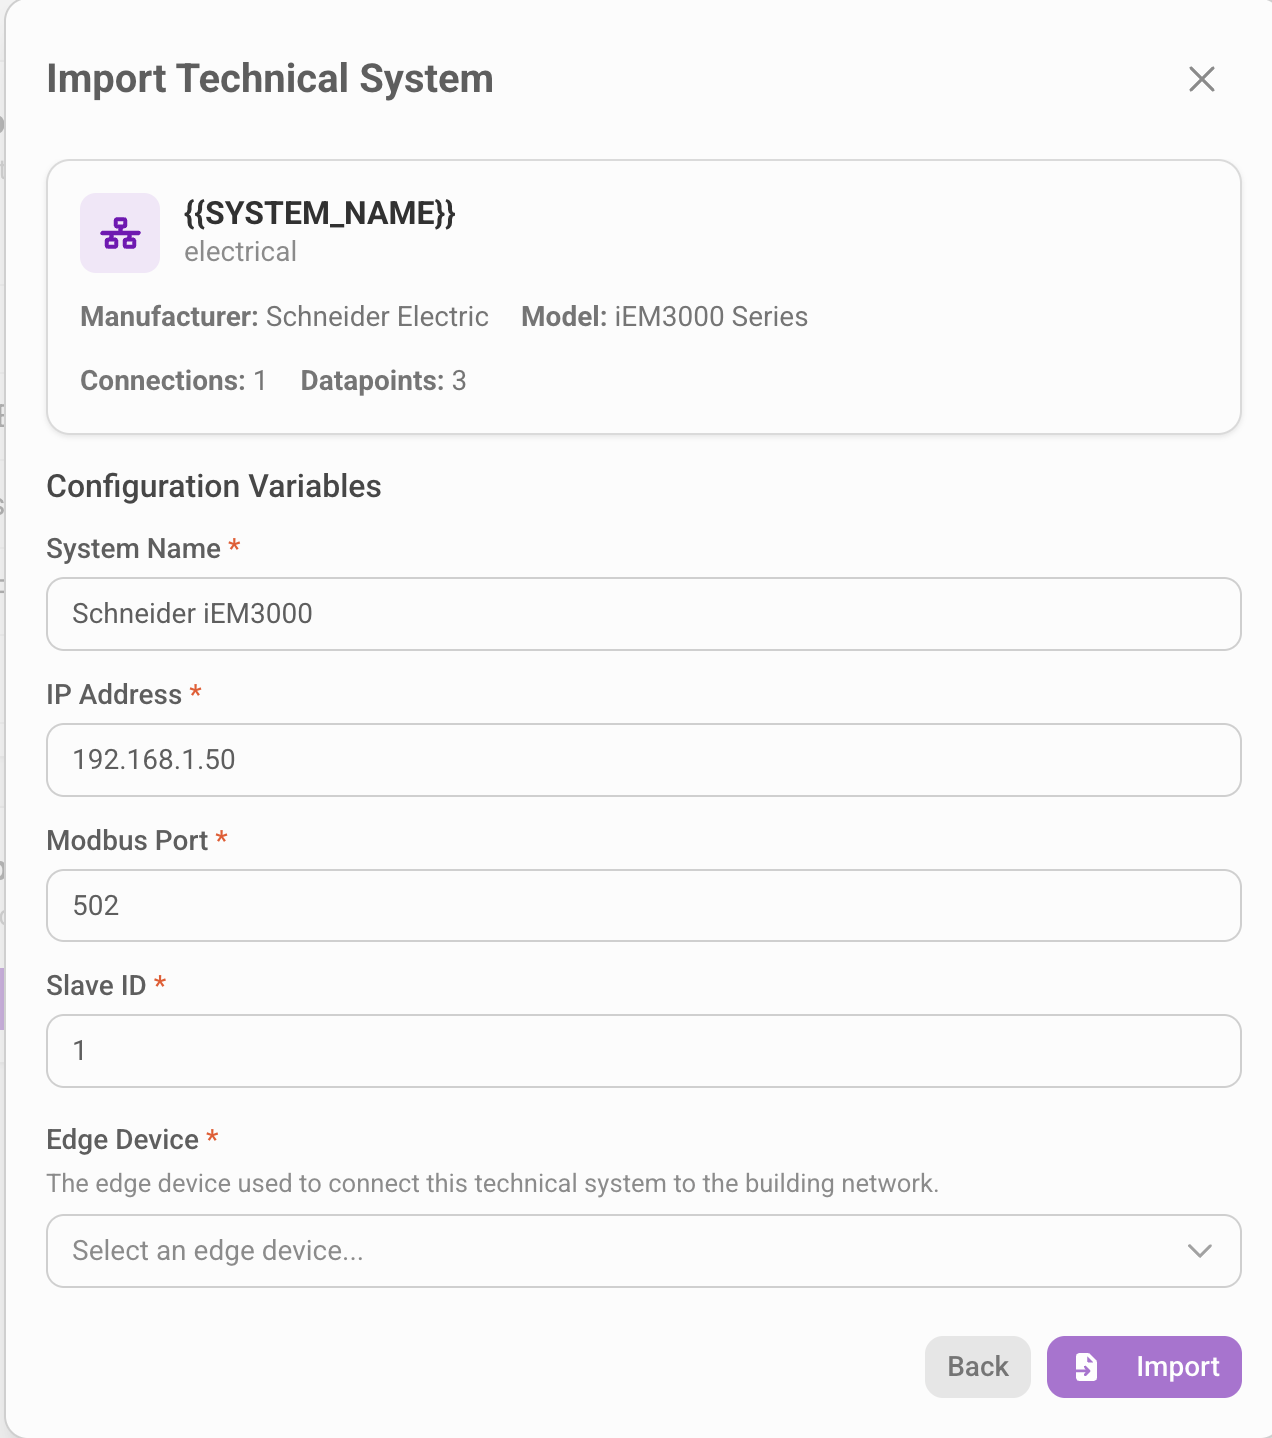
.fpl - In the preview step, verify that all the variables you declared show up as input fields with the correct labels
- Fill in values appropriate for the target site
- Pick an edge device (if the template includes connection config) and click Import
- Open the newly created technical system and check that the host, port, unit ID, and name reflect the values you just entered — not the defaults from the source site


If any variable still shows the original hard-coded value, double-check that:
- The
keyin thevariablesarray matches the placeholder exactly (case-sensitive) - The placeholder is surrounded by double curly braces:
{{HOST}}, not{HOST}or${HOST} - You re-packed the edited
manifest.json— not the original
Step 8: Share the template
Once the template imports cleanly, version it. Suggested practices:
- Name it descriptively —
schneider-iem3000-v1.fpl,daikin-vrv-iv-heating-v2.fpl - Store it in a shared drive or Git repository so the commissioning team always grabs the latest version
- Keep a CHANGELOG next to the file when the underlying equipment firmware or the manifest schema changes
- Document required variables — the
labelfield helps, but a short README with example values per site speeds up onboarding
Common pitfalls
| Symptom | Cause | Fix |
|---|---|---|
| Import fails with "Invalid manifest" | JSON syntax error from manual editing | Validate the JSON with a linter or jq before re-packing |
Placeholder stays as {{HOST}} in the imported system | Variable key doesn't match placeholder text | Check exact spelling and casing — HOST ≠ Host |
| Import fails with "Missing required variables: …" | Variable was required but not entered | Either enter a value in the wizard or set "required": false with a defaultValue |
Unit ID or port ends up as "502" (string) instead of 502 (number) | Variable type was string but should be integer | Change the variable type to integer and re-import |
| Import fails with "No manifest.json found in the package" | ZIP contains a wrapping folder instead of the files directly | Repack: select the contents, not the parent folder |
What's next
- Back to the overview: Importing and Exporting Technical Systems
- Extend your fleet: export more systems, promote their values, and build a library of standard templates per manufacturer